Sunday, November 30, 2008

Come By For A Visit....

I have started a new blog for my more crafty side.... Homespun Chic

I am no crafting expert, but I love to try new things and I also like keeping my hands busy (I quit smoking 12 years ago and still can't keep my hands still to this day!)
So come on by for a quick peek.... there's not too much there right now but I have loads of pics waiting to be put up and I am making new things every day. Links to my favorite crafty blogs are there on the side bar and I am always browsing for goodies so I will add them as I find them.

Keep Giggling!

Thursday, November 27, 2008

Ears, Noses, Skin & Touch....Back to the Human Body... Finally!

We have been continuing with our Human Body Project bit by bit... I just have not posted any pictures as of late due to poor time managment, kid distractions and yucky housework.

Look.... their binders are getting full....honest!
Photobucket

I know we left off with the Human Ear.....
We have done a few more models.... they are too fun to skip.

Photobucket

some double sided flash cards with the parts of the ear

Photobucket

a stand up model of the outer and inner ear.... this one is very simple and very easy to use - even for Halo

We also worked on the Nose.....

Photobucket

a lift the flap model

Photobucket

we talked about odors (good and bad) moving through the air.... you breath them in and reach the "smell cells"... the smell cells then send the messages to the brain

Photobucket

stand up model of the nose, inside and out

We did some projects on the skin and touch.

Photobucket

This is a neat moveable model

Photobucket

The magnified image lifts

Photobucket

the finger lifts and drops to press the key on the keyboard

This is by far one of my favorite models so far!

Photobucket

There are several layers that lift and then there are flaps with info underneath

Photobucket

Photobucket

There are even hair follicles and hairs!

We learned about the different nerves, touch, light touch, pressure pain, heat and cold. We alo learned where they are located amongst the skin cells... touch, pain and light touch are very close to the epidermis while pressure, heat and cold are in the lower dermis.

The boys love doing the hands on models... I am so glad I started this project with them!

Will post more as we go!

Friday, November 7, 2008

Christmas Countdown! (yes, I am starting early!)

Well, I saw this idea and decided to try it for myself.
My kids are allowed to eat a piece of Halloween candy after every meal for the first week after trick or treating. Well, even with three boys and myself and hubby snacking, that leaves A LOT of leftover candy. I thought this would be a great way to use it all up.

I used the following materials:

plastic cups from the $1 store (I could not find paper cups big enough to hold 3 pieces of candy in each)
bristol board
tissue paper
white glue
paint brush
stamps and stamp pad
glue gun

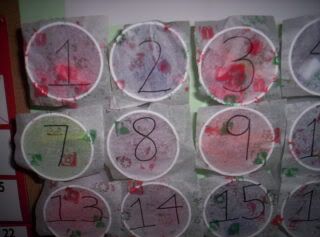
First, I had the boys use green and red ink and stamp all over white tissue paper.
I then cut it into squares that would cover the top of the cups.
I numbered each square with black marker.

Next, I laid out all of the cups and shoved (yes, shoving was required for some of the larger candies lol!) 3 candies in each cup.
I should point out that I first sorted the candy. By sorting, I mean I made sure that each cup had 3 pieces of candy that were EXACTLY the same to alleviate any arguing that would definitely occur should any sort of differences be spotted in said pieces of candy.

Once the cups were filled (we needed 48) I painted a tiny bit of white glue onto the edge of each cup. I did 10 at a time. Then, I place a piece of tissue paper on top of each cup.

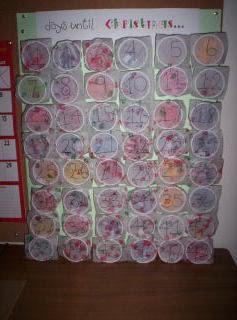
I then used a glue gun to attach each cup to the bristol board. I started at the bottom (lengthwise) with the last number and worked my way up counting backwards. I didn't measure anything and sort of just hoped for the best.

Once all the cups were glued onto the bristol board I gently carried it over to the large corkboard in the school room and used about 100 thumbtacks to hold it all in place.

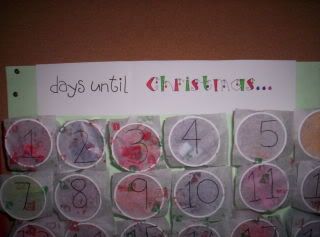
I added the words "days until Christmas...." using cute fonts and used double sided tape to attach it and cover up some of the thumbtacks at the same time.

Now, here's how the boys will use our Countdown board.....
Each day they "punch" through the tissue paper on one of the cups.... we still have to work out the turn taking but there were no battles this morning so I think I will let them work it our on their own :)

So now I have a way to use up all of the Halloween candy (no waste), save money because I don't have to by those piddly little advent calendars from the $1 store and the kids LOVE it!

Make one of your own using the tutorial link above or have fun trying different things to make it work for your family like I did!

Here is our finished countdown.....

Photobucket
Photobucket
Photobucket

Monday, November 3, 2008

TAGGED!

Well it seems as though I've been tagged by Punky, Papaya and Poochie....so here it goes:

First, the rules.....
Link to the person who tagged you. Post the rules on your blog. Write six random things about yourself. Tag six people at the end of your post. Let each person know he or she has been tagged. Let the tagger know when your entry is up.

Random Giggles:
I still sleep with a "binkie". It's tucked under my pillow.... always. Even when I travel.
I have two webbed toes on each foot..... darn cute webbed toes I might add!
I love Pickled Beets.
I used to be a blonde, before kids..... 9 months without hair dye changes that! Yes, they do have more fun!
I love knitting and just taught myself how to crochet.... gotta love you tube!
I just started my family on a more natural, less preservatives, more homemade, less meat diet.

Ok, now that you've got some dirt on me... it's my turn to pick a few people to spill their beans.
1. Summer Fae
2. Gerky
3. GHomeschool
4. Pirate Mom
5. Handmade Homeschool
6. Think!

Saturday, November 1, 2008

Of boys and tattoos......

My boys LOVE those temporary tattoos. They would be covered head to toe if I let them.
We picked up a package of them at the $1 store so I let the boys go nuts.

Photobucket
Photobucket
Photobucket
Photobucket

Photobucket
Photobucket
Photobucket

Tigers, Bugs and Lego... Oh My!

Every year I try to make the boys' costumes..... the boys pick out their ideas and mom tries to create it for them. It started out pretty easy but as the years go by, they are coming up with better and better ideas and mom's sewing is not improving on the same scale.

This year Halo wanted to be a Tiger Warrior...

Photobucket
A little face paint.....

Photobucket
Several pieces from costumes of years past (homemade) and a find at the thrift shop (the pants... can't see them very well but they are cute!

Ratchet wanted to be Bugnoid... a character from one of his favorite video games.

Photobucket
I actually sewed this....myself... no pattern! I am sooooo not a sewer LOL.... but I think it turned out.... I LOVE the antenna!

Daxter wanted to be a Lego Brick.

Photobucket
This one was pretty easy..... tuna cans and a box.. I sewed some straight straps to hold it all up and voila!
He got complimented all night long for coming up with such a great idea.

Can't wait to see what they come up with next year. Well, Ratchet already has his planned out... will see if it holds.

Pumkin Carving with the Giggles

We got three huge pumpkins this year and let the kids carve them.

Photobucket

First, the boys had to "gut" their pumpkins..... ooey, gooey pumpkin guts!

Photobucket
Photobucket
Photobucket
Photobucket

Then, they had to draw their design on paper.

Photobucket
Photobucket

Then, dad drew their designs onto the pumpkins.

Photobucket

Now, onto the fun part! Carving!

Photobucket

Photobucket

Photobucket

Where is Halo you ask?

Photobucket
Photobucket

Poor kid had a wicked fever.... passed out cold.

Photobucket
Ratchet's Pumpkin

Photobucket
Daxter's Pumpkin

Photobucket
Halo's Pumpkin.... dad had to carve it but Halo still loves it!

Photobucket
Pumpkins on display......